Amazon RDS (Relational Database Service) for MySQL is a fully managed database service designed to simplify the deployment, management, and scaling of MySQL databases in the cloud. The service is an attractive option because of its high availability and durability through automated backups, automated software patching, and the option to create read replicas for improved performance and scalability. Not to mention you do not need to be a DBA to perform these tasks. Managing a database is even easier with Amazon Web Services (AWS) like CloudWatch and Cloudshell.
AWS Cloudwatch is a comprehensive monitoring and observability service that enables users to collect and track metrics, logs, and events from various AWS resources and applications. It is easy to navigate and use. However, there is no way to compile the information into one report, like a health check or status report. XTIVIA created a bash script to collect metrics and parameters of the operating system and MySQL instance. Using a bash script enables XTIVIA DBAs to have more control over what information is gathered on an AWS RDS Instance and puts all the information into one output, as opposed to clicking through the Cloudwatch dashboard and manually entering the information elsewhere (because who wants to do that). Also, by connecting to the MySQL instance, you can get information not available in the AWS Cloudwatch, like schema sizes and table fragmentation.
AWS Cloudshell makes running bash scripts possible. With CloudShell, users can execute commands, run scripts, and utilize various tools and utilities to manage their AWS infrastructure and services, all without needing to install any software on their local machines. Connecting to MySQL from the AWS Cloudshell CLI is essential to running a bash script. This blog will go over the steps to connect to a MySQL instance using AWS Cloudshell and include a few examples of useful queries.
The first step is to get the IP address of the AWS Cloudshell Interface. Curl, NodeJS, and Python are already installed on Cloudshell. The syntax below uses curl.
[cloudshell-user@ip-10-2-67-20 ~]$ curl -s checkip.dyndns.org | sed -e 's/.*Current IP Address: //' -e 's/<.*$//'Once you have the IP address, you must add it to the security group. From the AWS Cloudshell CLI, you add the IP address using the syntax below. Placeholders for the RDS instance’s security group ID and IP address are highlighted.
[cloudshell-user@ip-10-2-67-20 ~]$ aws ec2 authorize-security-group-ingress --group-id SecurityGroupID --protocol tcp --port 3306 --cidr IPAddress/32The security group can be found on the RDS Management Console (highlighted below).

Confirmation will look something like this:
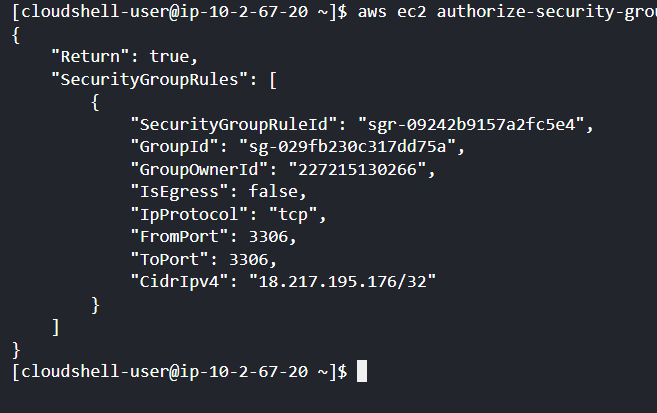
Once the IP address is added to the security group, you can log into MySQL using the command below. Replace the highlighted portions with the appropriate credentials. The host is the RDS endpoint. This example assumes the port is 3306 (default).
[cloudshell-user@ip-10-2-67-20 ~]$ mysql --host=RDS_endpoint --port=3306 --user=master_username --password=master_passwordIf all goes well, you will be logged into MySQL. If your instance uses SSL certificates, you must add the—ssl-ca option to the command. More information on logging into a MySQL instance using SSL certificates can be found here
Now this is not exactly running a bash script. We just logged into the MySQL instance. When creating the script, I recommend using variables for the hostname, port, username, and password, which I have included in the MySQL examples. If you need a refresher, the basics of writing a bash script can be reviewed in a previous blog, The Elements of a Bash Script.
The examples can be executed from the command line or within a bash script. The -t option will return the result set in table format. The -e option allows the subsequent MySQL query to be executed from the command line.
Use the syntax below to obtain values for all status variables, including information like the number of temporary tables written to disk and the number of connections aborted.
mysql --host=$mysqlHost --port=$mysqlPort --user=$mysqlUser --password=$mysqlPW -t -e "SHOW GLOBAL STATUS;"The syntax below can be used to get the number of user-defined schemas in a database. The count function can be removed to get all the names of the user-defined schemas in a database.
mysql --host=$mysqlHost --port=$mysqlPort --user=$mysqlUser --password=$mysqlPW -t -e "SELECT count(DISTINCT table_schema)
 FROM information_schema.tables
 WHERE table_schema
 NOT IN ('mysql','information_schema','sys','performance_schema');"
Some of you might be thinking, “Why don’t I just connect remotely and tee all of the commands?” Well, you can do that, but you can’t run any of the AWS commands that describe the RDS instance. In a bash script uploaded onto AWS Cloudshell, you can run both the MySQL and AWS commands with one output to review all the information in one place.
If you need help getting started in AWS, VDBA can assist. Contact a sales rep to get more information.