For IT professionals, managing a sprawling network of servers can feel like navigating a dense jungle. Keeping track of individual servers, ensuring their proper configuration, and performing maintenance tasks can quickly become overwhelming. Fortunately, Microsoft SQL Server provides valuable tools to cut through the complexity: Registered Servers and Central Management Servers (CMS). This blog post explores the advantages of these tools and offers a basic setup guide.
Benefits of Registered Servers and CMS
- Enhanced Organization: Imagine a central map of your entire server jungle, where you can categorize servers based on function (development, testing, production), application, or any other relevant criteria. Both Registered Servers and CMS offer this functionality. This eliminates the need to wander aimlessly through endless server lists, fostering a more organized and efficient environment.
- Increased Efficiency: Both Registered Servers and CMS empower you to perform tasks on multiple servers simultaneously. Need to reboot all the servers in the development area? These tools automate repetitive tasks, saving you valuable time and effort. Scripting a task and executing it with a single click is far more efficient than connecting to each individual server and restarting them manually.
- Improved Security (CMS only): A key advantage of CMS over Registered Servers is that access to the server list is managed by the msdb database on the CMS SQL instance compared with a locally stored XML file (passwords are encrypted). To manage the central management server, a user needs to be assigned the ServerGroupAdministratorRole role. To be able to connect to the CMS, a user needs to have membership in the ServerGroupReaderRole role. This granular control, exclusive to CMS, strengthens security compared to Registered Servers, where access is managed at the individual server level.
- Collaboration
- (CMS): Another benefit exclusive to CMS is the ability to easily share the server map along with any updates with multiple authorized users. This fosters collaboration within teams where multiple administrators require access to manage different areas of the server jungle. While Registered Servers are user-specific and each administrator would need to maintain their own map, it is possible to export and share a Registered Server list between users.
Pros and Cons of Local Registered Servers vs. Centrally Managed Servers
Local Registered Servers
- Pros:
- Easy Setup: Great for individual users who want to quickly connect to a few specific servers.
- Privacy: Connection information is stored locally on the user’s machine, only accessible to that user.
- Offline Use: Lists can still be accessed even if not connected to the network.
- Works with Different Authentication: Supports both SQL Server Authentication and Windows Authentication.
- Supports Various Server Types: Can be used for database engine, SSAS, SSIS, and SSRS.
- Cons:
- Limited Sharing: List is only accessible to the individual user who created it or through exporting and sharing the list as a file.
- Scalability Issues: Managing a long list of servers can become cumbersome for one user.
Centralized Management Servers
- Pros:
- Shared Access: Multiple users can access and manage a single list with proper permissions.
- Centralized Management: Easier to maintain the list of servers for multiple users, especially in large environments.
- Improved Security: Permissions can be centrally controlled for user access to different servers.
- Cons:
- More Complex Setup: Requires additional configuration compared to Local Servers.
- Limited Offline Use: List may not be accessible if the central server is unavailable.
- Windows Authentication Only: Currently only supports Windows Authentication for access.
- Limited Server Type Support: Primarily designed for the SQL Server database engine (though some versions may support others).
Here’s when you might choose one over the other:
- Use Local Servers for: Individual users with a small number of servers to manage, or when needing offline access or working with non-Windows Authentication.
- Use Centralized Servers for: Teams needing to share server access and configurations or organizations with many servers requiring centralized management.
In some cases, you might even find it beneficial to use both approaches. Local servers can be a convenient way for individual users to quickly access their frequently used servers, while a Centralized Server provides a central point for managing the overall server infrastructure.
Setting Up Registered Servers and CMS
Here’s a basic overview of both options:
Setting up Registered Servers
1. Launch SQL Server Management Studio (SSMS).
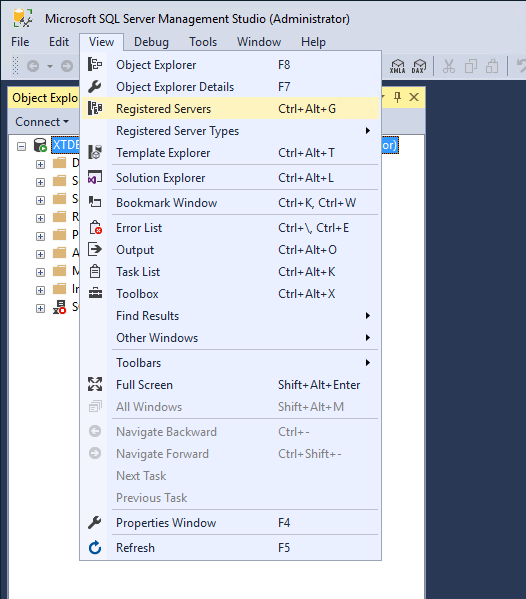
2. Navigate to “View” > “Registered Servers”:
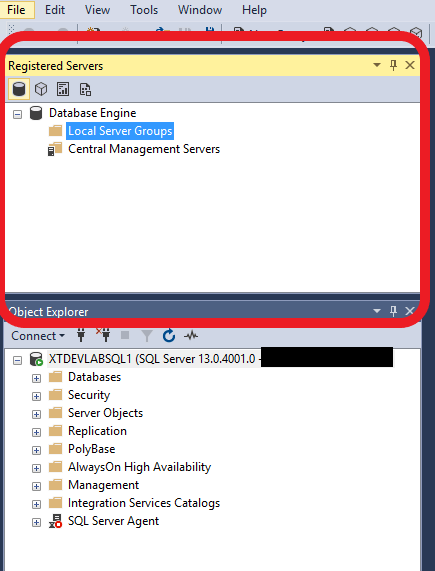
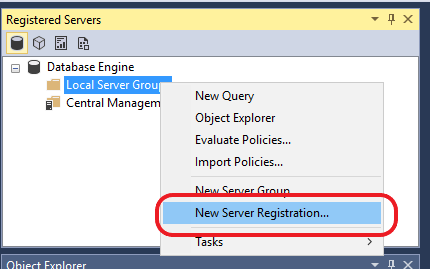
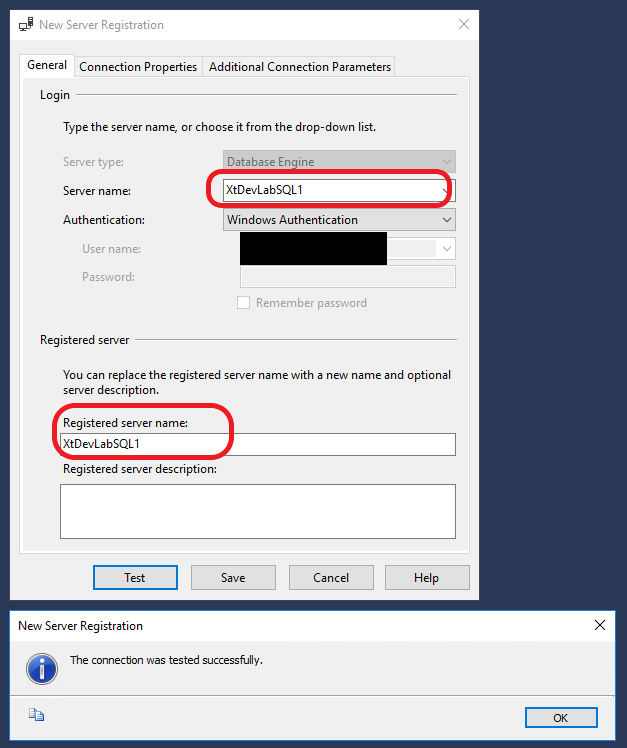
3. Right-click on “Local Server Group” and select “New Server Registration…”
4. For the “Server Name,” enter the SQL Server address
- After entering the SQL Server address, you can click “Test” to verify the connection.
- The “Registered server name:” field can be used to give the server a more user-friendly name.
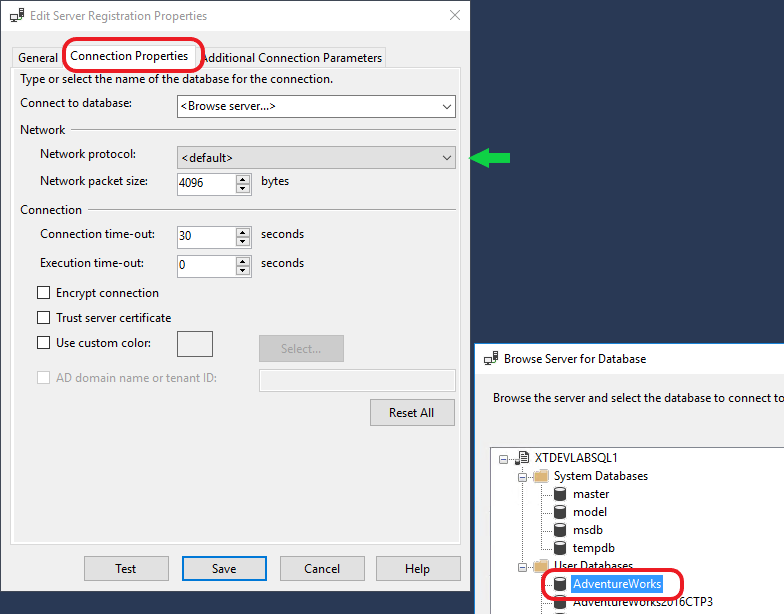
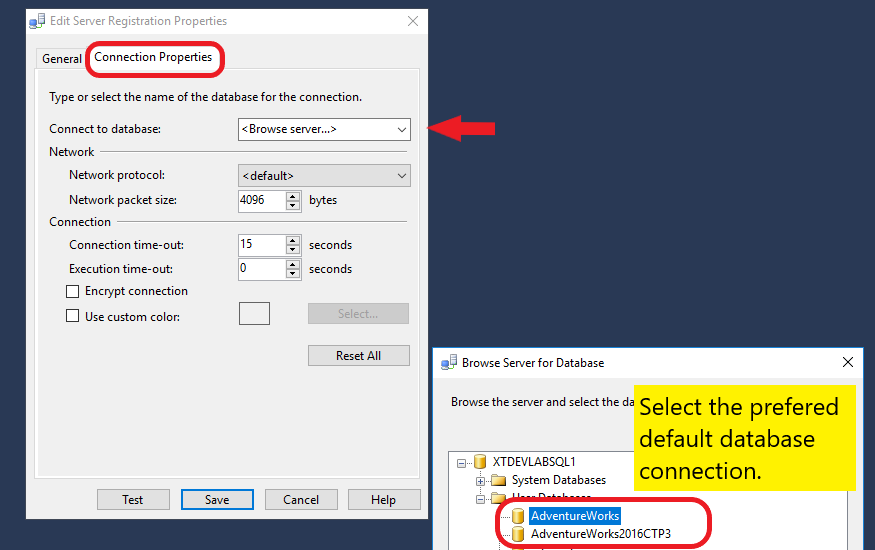
5. (Optional) Change the initial database connection. In some scenarios, you may want to change the default database connection from the user’s default database (typically master) to a specified database. This might be useful if you frequently query a specific database on multiple servers.
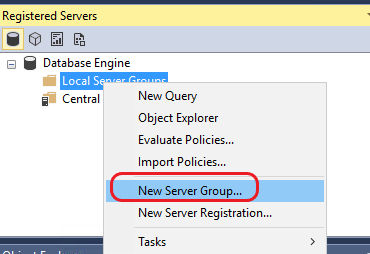
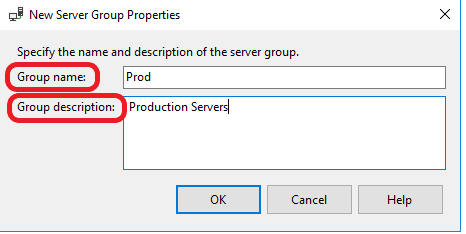
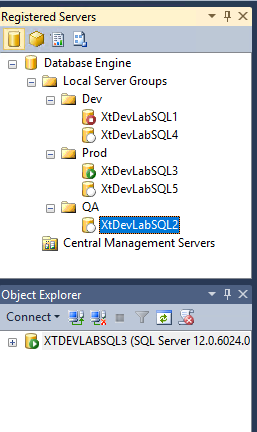
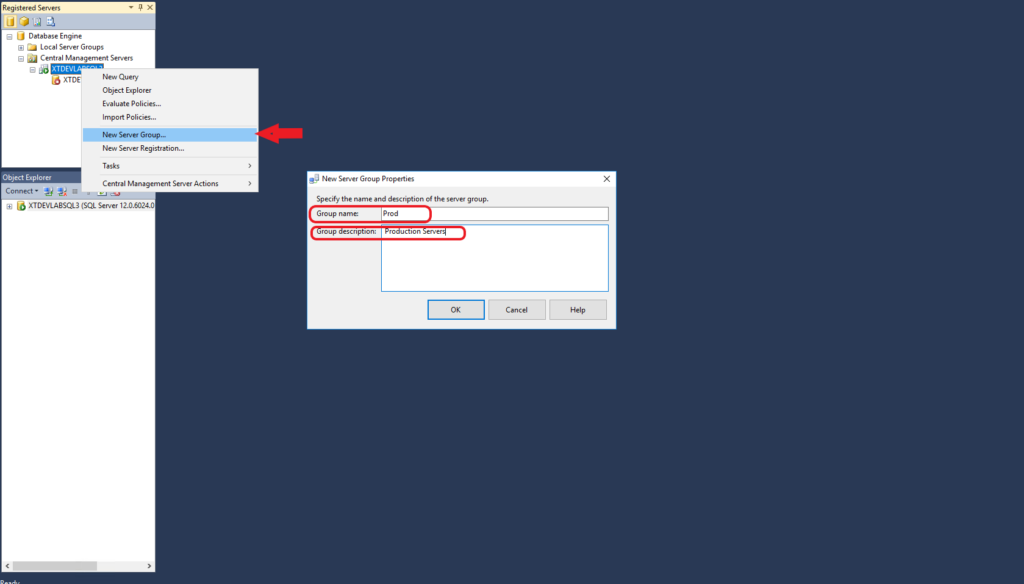
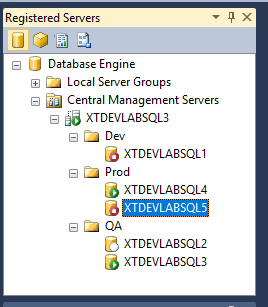
6. (Optional) Organize your servers by creating folders. This allows you to create different sections to simplify navigation, especially in large deployments. For example, you can separate your Development, QA, and Production servers into different folders.
7. Connecting to Registered Servers:
You can connect to individual Registered Servers by double-clicking your desired server. This will add it to “Object Explorer”.

8. Querying Registered Servers
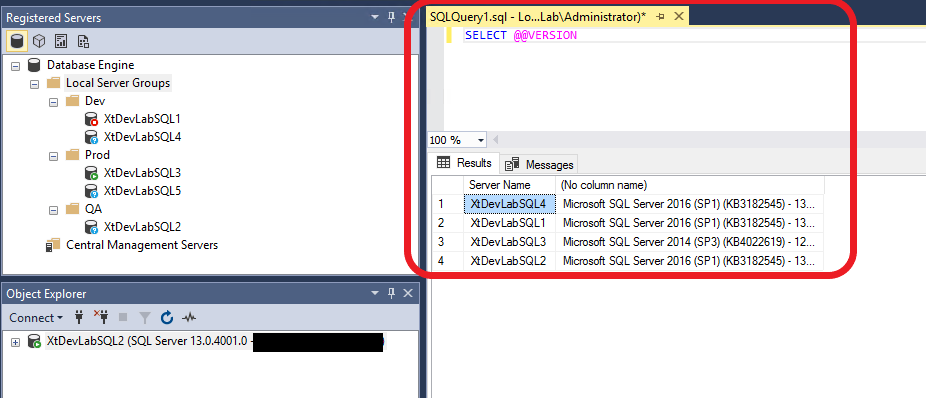
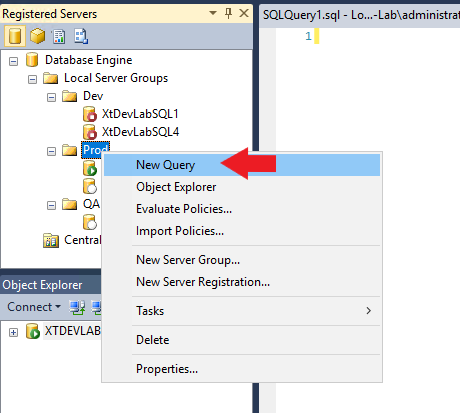
Query All Registered Servers. Right-click on the base folder, “Local Server Groups,” and select “New Query.” Depending on how many servers you have, it might take some time to connect to them all.

Query results will be separated out by the server.
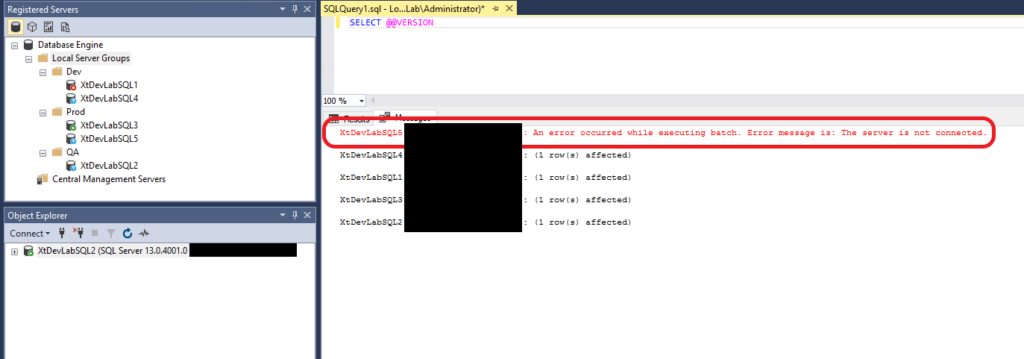
If SSMS is unable to connect to any of the servers, it will be noted at the bottom of the query window.
Additionally, after the query is run, any servers that could not be connected will be listed in the messages tab.
Query a Registered Server Group
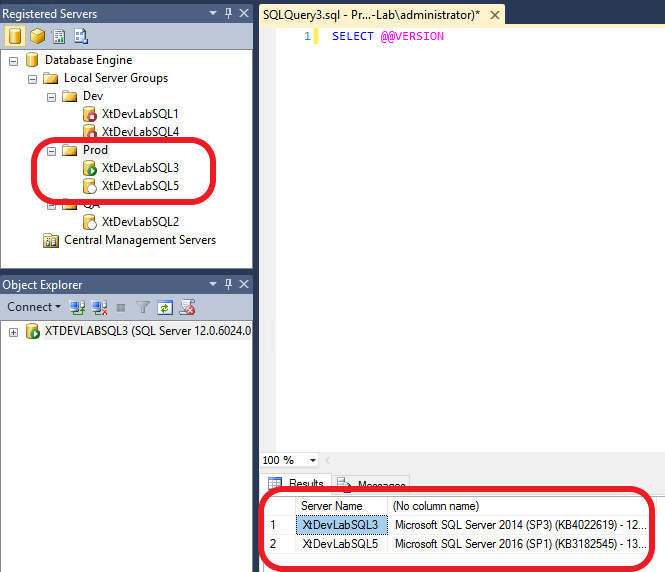
If you want to query only servers that are part of a Registered Server Group, right-click on the desired group and select “New query.”
This is very useful when you want to query only a few servers. As you can see below, the query only returned results from the “Prod” Server Group.
Query a specific instance
Export / Backup Registered Servers:
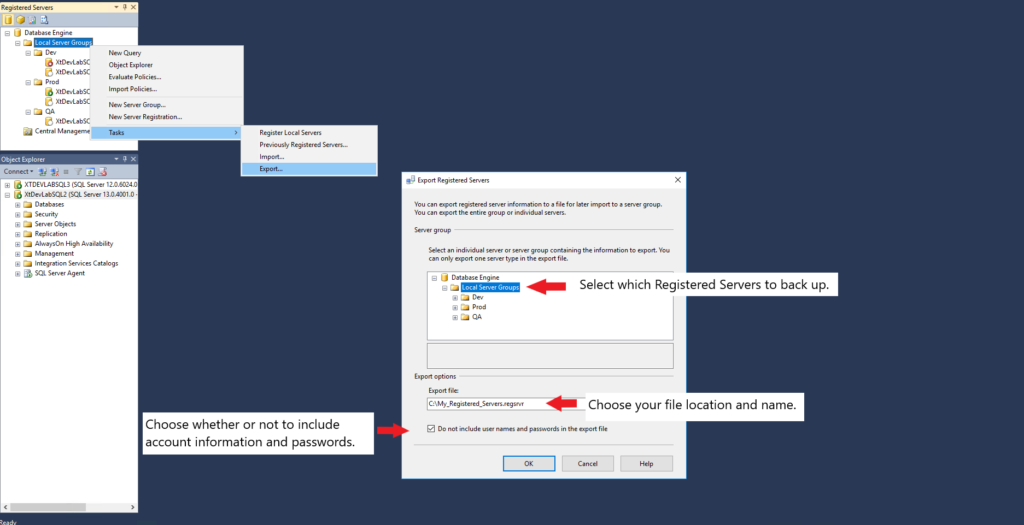
- To Export: Right-click on “Local Server Group” > Select “Tasks” > Select “Export . . .”
- Choose what to export: From here, you can choose which servers you want to be included in your export file, whether that is at the root “Local Server Groups” level, a specific “Server Group” like “QA,” or a specific individual server.
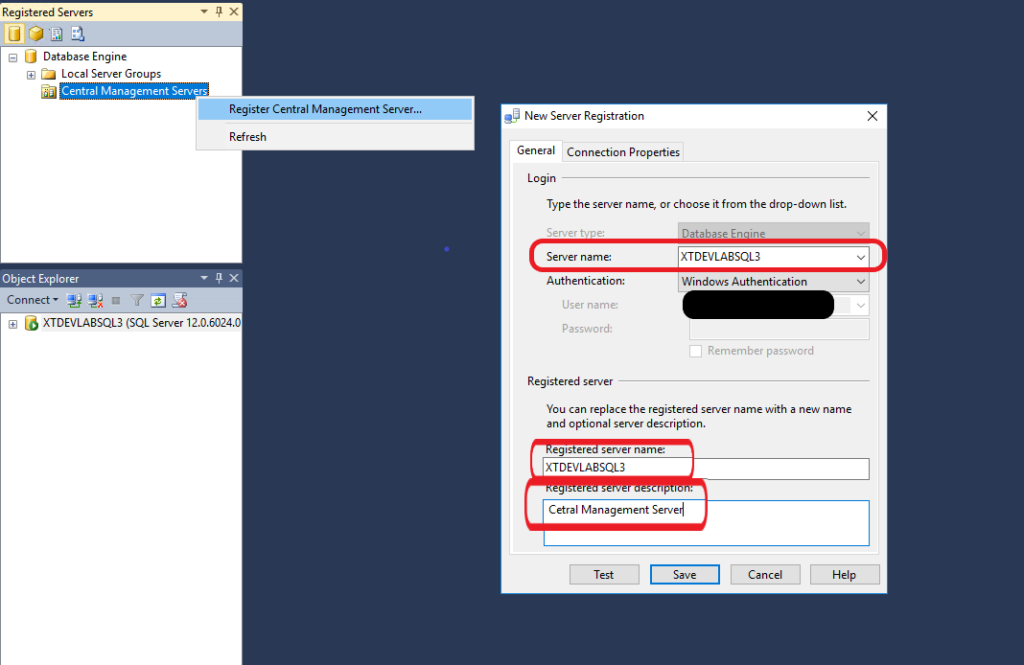
Setting up a Central Management Server (CMS)
1. Designate a reliable server with sufficient resources to act as the CMS.
2. On the CMS server, open SSMS and go to “View” > “Central Management Servers”
Right-click on “Central Management Servers” and then select “Register Central Management Server. . .”
Enter your:
- Server name: which is your SQL Server address
- The “Registered server name:” field can be used to give the server a more user-friendly name.
- (Optional) The “Registered server description” can be used for a brief description
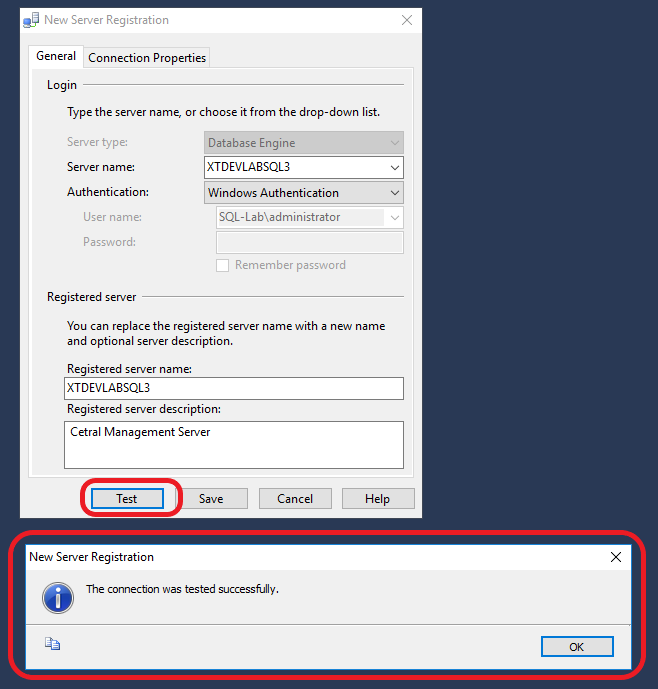
You can test the settings using the “Test” button:
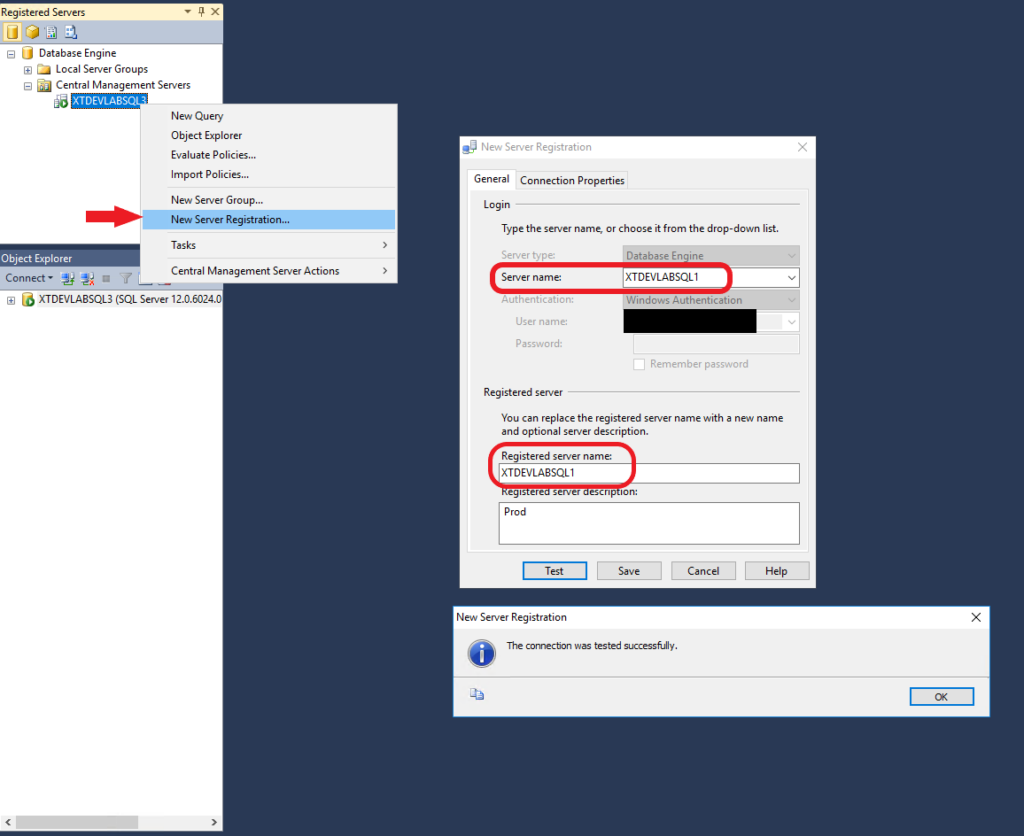
Your Centrally Managed Server is now available to share with the rest of your team by sharing which SQL instance the CMS is hosted on. Now to add servers to your collection.
3. Add Registered Servers to your CMS: Right-click on “Central Management Server” and select “New Server Registration…”
Enter your:
- Server name: which is your SQL Server address
- The “Registered server name:” field can be used to give the server a more user-friendly name.
- (Optional) The “Registered server description” can be used for a brief description
4. (Optional) Change the initial database connection. In some scenarios, you may want to change the default database connection from the user’s default database (typically master) to a specified database. This might be useful if you frequently query a specific database on multiple servers.
5. (Optional) Organize your servers by creating folders. This allows you to create different sections to simplify navigation, especially in large deployments. For example, you can separate your Development, QA, and Production servers into different folders.
Connecting to, Querying, and Exporting / Backing up Registered Servers: Connecting to, querying, and exporting/backing up CMS-registered servers is the same process as querying Local Registered Servers. See previous sections Connecting to Registered Servers, Query Registered Servers, and Export / Backup Registered Servers.
Bonus Tip
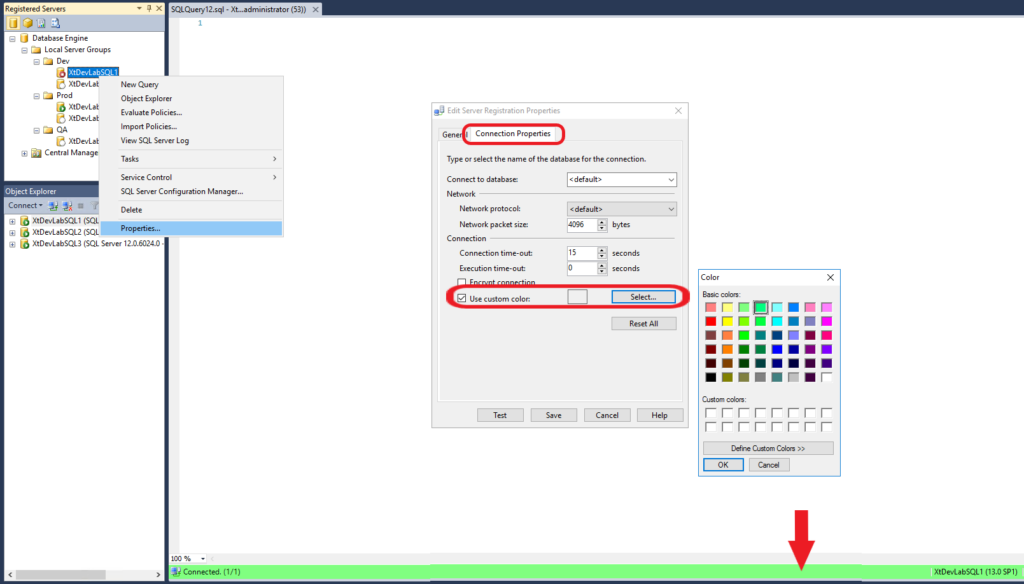
Organize Servers by color:
Ever wonder which server you’re connected to? Assigning colors to your different servers can give you a quick visual clue to help you avoid confusion. Imagine:
- Green servers for development (Dev) environments – perfect for testing new code.
- Yellow servers for quality assurance (QA) environments – ideal for catching bugs before they reach production.
- Red servers for production environments – where everything runs live!
By coloring your servers, a glance at the bottom information bar will tell you exactly which environment you’re working in. This can be a lifesaver to avoid accidentally running queries on the wrong server!
Here’s how to set it up: Go to your “Connection Properties” and look for “Use custom color:” Pick your color, and you’re good to go.
Note regarding Cloud-Based Instances
Yes, you can add Azure Managed Instances, Amazon EC2, and RDS instances to the local Registered Servers and CMS lists.
To add an Azure Managed Instances, Amazon EC2, or Amazon RDS instance to the local Registered Servers or Centrally Managed Servers, you would typically follow these steps:
- Ensure that the machine hosting the Registered Server or CMS has network connectivity to the instance. This might involve configuring network security groups or firewall settings to allow traffic to the cloud-based instance.
- Obtain the necessary connection information for the instance, including the endpoint (hostname), port number, and credentials (username and password).
- When setting up new registered servers, use the connection information obtained in step 2 and follow the same steps outlined above.
Once the connection is established, you can manage these types of instances, similar to how you would manage any other database instance. This includes executing queries, performing administrative tasks, and managing database objects.
Conclusion
Implementing registered servers or central management servers for enhanced security and collaboration can give you significant control over your server jungle. These tools streamline organization, increase efficiency, and strengthen security, ultimately allowing you to manage your server infrastructure with greater ease and effectiveness.
For any questions, please contact us.