
SUMMARY:
To achieve significant cost savings in Azure SQL, database administrators can optimize large-scale data deletion tasks by disabling nonclustered indexes before the operation and rebuilding them afterward.
- This “disable and rebuild” strategy can perform large deletions up to 63% faster and with 64% less I/O compared to leaving indexes active.
- Key benefits in Azure include direct cost savings in the vCore model, avoidance of performance throttling, and reduced transaction log activity.
- Using a batched approach for the deletion is critical to keep transactions small and minimize the overall impact on the database system.
- Disabling and rebuilding indexes is a safer and more robust strategy than dropping and recreating them because it preserves metadata, permissions, and object integrity.
Adopting this maintenance technique is a decisive strategy for any organization looking to optimize database operations and control cloud spending in Azure.
Table of contents
- SUMMARY:
- Is Your Database Maintenance Driving Up Your Azure Bill?
- Setting the Stage: The Test Environment
- The Deletion Method: A Batched Approach
- The Test Scenarios: A Head-to-Head Comparison
- The Results Are In: Analyzing the Performance Data
- The Real Win: Cost and Stability in Azure
- Conclusion: A Smarter Strategy for Modern Databases
- FAQ
Is Your Database Maintenance Driving Up Your Azure Bill?
In the world of cloud computing, efficiency is everything. Every CPU cycle, every megabyte of I/O, and every minute of processing time translates directly into cost. For database administrators, routine maintenance tasks like purging or archiving old data can become major operational expenses, especially when dealing with millions of rows. A simple DELETE statement, if not handled correctly, can run for hours, bogging down your server and inflating your Azure bill.
But what if there was a way to perform these large-scale deletions in a fraction of the time and with a fraction of the resources? This article will demonstrate a powerful strategy: disabling nonclustered indexes before a large deletion and rebuilding them afterward. Through a practical, data-driven comparison, we’ll show you why this method is vastly superior to leaving indexes enabled and how it can become a cornerstone of your cost-optimization strategy in Azure.
Setting the Stage: The Test Environment
To conduct a fair performance test, we used the popular StackOverflow2010 sample database running on SQL Server 2022: our target table, dbo.Posts, contains approximately 3.7 million rows.
Simulating a Real-World Heap
In many production environments, tables exist without a clustered index, which are known as heaps. To simulate this common scenario, our first step is to drop the clustered primary key on the dbo.Posts table. This action converts the table from a clustered structure to a heap, setting the stage for our tests.
SQL
-- Drop the clustered primary key to convert the table to a heap
ALTER TABLE [dbo].[Posts] DROP CONSTRAINT [PK_Posts__Id] WITH (ONLINE = OFF);
GO
The Deletion Method: A Batched Approach
Running a single DELETE statement to remove millions of rows is a recipe for disaster. It creates a massive transaction that can lock the table for an extended period and risk filling the transaction log. To avoid this, we’ll use a batched approach, deleting data in manageable chunks of 100,000 rows. This keeps transactions small and minimizes the impact on the system.
The following script will be used for the deletion in all our test scenarios.
SQL
DECLARE @batSize INT = 100000;

-- Loop continuously until we explicitly break out
WHILE 1 = 1
BEGIN
    -- Use a CTE to define the batch of rows to be deleted
    WITH RowsToDelete AS
    (
        SELECT TOP (@batSize) *
        FROM dbo.Posts
        WHERE CreationDate >= '20100101'
    )
    DELETE FROM RowsToDelete;

    -- If no rows were deleted, our work is done
    IF @@ROWCOUNT = 0
        BREAK;

    -- A small delay to be kind to the transaction log
    PRINT 'Deleted ' + CAST(@batSize AS VARCHAR) + ' rows...'
    WAITFOR DELAY '00:00:01';
END

PRINT 'Batch deletion complete.';
GO
The Test Scenarios: A Head-to-Head Comparison
Our experiment compares two primary strategies across five scenarios, each starting with a fresh restore of the database to ensure identical conditions.
- The “Leave ’em On” Approach: Deleting data while nonclustered indexes are active.
- The “Disable and Rebuild” Approach: Disabling indexes, deleting data, and then rebuilding them.
The Indexes in Play
We’ll use up to three different nonclustered indexes (NCIs) for our tests.
SQL
-- Used in Scenarios 2 & 4
CREATE NONCLUSTERED INDEX [IDX_Posts_CreationDate]
ON [dbo].[Posts]([CreationDate]);
GO

-- Added for Scenarios 3 & 5
CREATE NONCLUSTERED INDEX [IDX_Posts_AnswerCount_OwnerUserId]
ON [dbo].[Posts]([AnswerCount],[OwnerUserId]);
GO

CREATE NONCLUSTERED INDEX [IDX_34]
ON [dbo].[Posts] ([LastEditorDisplayName],[ViewCount],[FavoriteCount],[AnswerCount],[CommentCount],[Score],[Tags]);
GO
The Magic Script: Disabling and Rebuilding Indexes
For our second strategy, we use dynamic SQL to disable and rebuild all NCIs on our table programmatically. This is a handy script for any DBA’s toolkit.
Script to Disable/Rebuild All NCIs on a Table:
SQL
-- Set @EnableOrRebuild to 'DISABLE' or 'REBUILD'
DECLARE @EnableOrRebuild NVARCHAR(20) = 'DISABLE';
DECLARE @TableName NVARCHAR(200) = 'Posts';
DECLARE @SchemaName NVARCHAR(200) = 'dbo';
DECLARE @SqlStmt NVARCHAR(MAX) = N'';

SELECT @SqlStmt = @SqlStmt + N'ALTER INDEX '
    + QUOTENAME(i.name) + N' ON '
    + QUOTENAME(@SchemaName) + '.' + QUOTENAME(o.name) + ' '
    + @EnableOrRebuild + N';' + CHAR(13) + CHAR(10)
FROM sys.objects o
INNER JOIN sys.indexes i ON o.[object_id] = i.[object_id]
INNER JOIN sys.schemas s ON o.[schema_id] = s.[schema_id]
WHERE i.type_desc = 'NONCLUSTERED'
  AND o.type_desc = 'USER_TABLE'
  AND o.name = @TableName
  AND s.name = @SchemaName;

-- To view the generated commands
PRINT @SqlStmt;
-- To execute the commands
-- EXEC (@SqlStmt);
Why Disable and Rebuild vs. Drop and Recreate?
A great question that often comes up is why we choose to DISABLE and REBUILD indexes instead of simply DROPping and CREATEing them. While both methods can achieve a similar outcome, the disable/rebuild approach offers several key advantages, making it a safer and more robust strategy.
- Preserves Metadata and Permissions: When you
DISABLEan index, its definition—the name, key columns, included columns, and filter predicates—remains intact within the system’s metadata. This means you don’t need to have the originalCREATE INDEXscript handy to bring it back online; a simpleREBUILDcommand is all that’s required. This is a lifesaver in complex environments where original DDL scripts might be hard to track down. - Maintains Object Integrity: Dropping and recreating an index can change its underlying
index_id. While this might seem minor, it can impact foreign key constraints or internal monitoring scripts that rely on a static object ID. The disable/rebuild cycle ensures the index’s identity remains consistent. - Simpler Intent: The
DISABLEandREBUILDcommands clearly state the intent: to take an index offline temporarily for maintenance. It’s a single, cohesive operational cycle. Dropping an index is a more destructive and permanent action, which can be riskier if the subsequentCREATEscript fails for any reason.
It’s important to note that you cannot disable an index that supports a PRIMARY KEY or UNIQUE constraint. For those, you must DROP the constraint (which also drops the index) and then ADD the constraint back to recreate it.
The Results Are In: Analyzing the Performance Data
In each test, we deleted 2,165,685 rows. The performance data tells an obvious story.
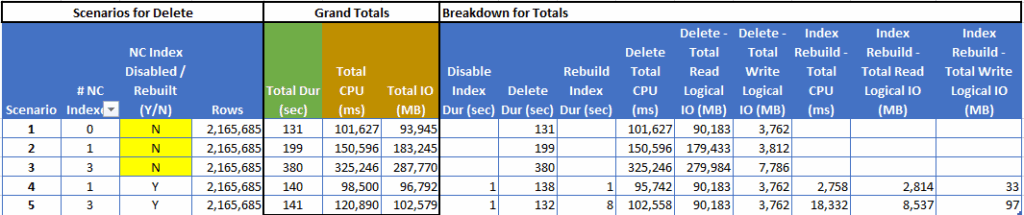
Scenario 1: The Baseline (No Indexes)
With no indexes to maintain, the DELETE operation sets our performance baseline.
- Total Duration: 131 seconds
- Total CPU: 101,627 ms
- Total Logical IO: 93,945 MB
Scenarios 2 & 3: The High Cost of “Leaving Indexes On”
Here, we see the significant overhead added by active indexes.
- Scenario 2 (1 NCI): Duration jumped to 199 seconds (a 52% increase).
- Scenario 3 (3 NCIs): Duration ballooned to 380 seconds (a 190% increase).
This demonstrates that for every row deleted from the table, SQL Server performs additional I/O- and CPU-intensive work to remove the corresponding entries from each index. In a cloud environment, this extra work translates directly to higher costs.
Scenarios 4 & 5: The “Disable and Rebuild” Triumph
Now, let’s look at the results when we disabled the indexes first.
| Scenario | Total Duration | DELETE Duration | Rebuild Duration | Comparison to “Leave ’em On” |
| 4 (1 NCI) | 140 sec | 138 sec | 1 sec | 30% Faster than Scenario 2 |
| 5 (3 NCIs) | 141 sec | 132 sec | 8 sec | 63% Faster than Scenario 3 |
The results are staggering. By disabling the indexes, the core DELETE operation performed nearly as fast as our baseline with no indexes at all. The time to disable and rebuild was minimal. For the three-index scenario, we accomplished the same work 63% faster and with 64% less I/O.
The Real Win: Cost and Stability in Azure
This isn’t just a performance trick; it’s a critical strategy for cloud resource management.
Direct Cost Savings (vCore Model)
In Azure SQL’s vCore model, you pay for provisioned resources. By reducing CPU and I/O by over 60%, the “disable and rebuild” method allows you to run major maintenance tasks on a lower, more cost-effective service tier. It prevents resource spikes that might otherwise force you to overprovision or scale up your instance, saving you real money.
Avoiding Performance Throttling
Every Azure SQL tier has resource limits (IOPS, CPU). The “leave ’em on” approach’s high resource consumption increases the risk of hitting these limits, which causes throttling and impacts the performance of all applications using the database. Our recommended strategy keeps resource usage low and predictable, protecting the health of your entire instance.
Taming the Transaction Log
A fully indexed DELETE generates immense transaction log activity. In Azure, this can lead to LOG_RATE_GOVERNOR waits, a common and frustrating performance bottleneck. The batched DELETE on a heap is far gentler on the log, ensuring a smoother, more reliable operation.
Conclusion: A Smarter Strategy for Modern Databases
When faced with deleting a large volume of data, the evidence is overwhelming. The strategy of disabling nonclustered indexes, performing the deletion, and then rebuilding them is massively more efficient.
The minimal overhead of a quick disable/rebuild cycle is dwarfed by the savings in duration, CPU, and I/O. For any organization looking to optimize its database operations and control cloud spending, adopting this technique is a clear and decisive win.
FAQ
Routine database maintenance, especially large-scale data deletions, can significantly increase Azure costs. This is because every CPU cycle, I/O operation, and minute of processing time translates directly into expense in the cloud. A simple DELETE statement, if not optimized, can run for hours, consuming excessive server resources and inflating your Azure bill. The “leave ’em on” approach (deleting data with indexes active) leads to substantial overhead in CPU and I/O due to the need to update each index for every deleted row, which directly translates to higher expenditure in Azure’s vCore model.
The recommended strategy for optimizing large-scale data deletions in Azure SQL databases is to “Disable and Rebuild” nonclustered indexes. This involves disabling all nonclustered indexes on the target table before performing the deletion, executing the batched DELETE operation, and then rebuilding the indexes afterward. This method significantly reduces the CPU and I/O overhead during the deletion, making the process much faster and more resource-efficient compared to leaving indexes enabled.
A batched approach is crucial for large-scale deletions because running a single DELETE statement for millions of rows is highly inefficient and risky. A single large transaction can lock the table for extended periods, potentially causing system downtime. It can also risk filling the transaction log, leading to performance issues or even database outages. By deleting data in manageable chunks (e.g., 100,000 rows per batch), the batched approach keeps transactions small, minimizes the impact on the system, reduces the transaction log activity, and ensures a smoother, more reliable operation.
Preserves Metadata and Permissions: Disabling an index keeps its definition (name, columns, filter predicates) intact in the system metadata, meaning you don’t need the original CREATE INDEX script to bring it back online; a REBUILD command suffices.
Maintains Object Integrity: This approach ensures the index’s index_id remains consistent, which is essential for foreign key constraints or internal monitoring scripts that rely on static object IDs.
Simpler Intent: The DISABLE and REBUILD commands clearly communicate the intent of temporary maintenance, whereas dropping is a more permanent and destructive action that carries a higher risk if the recreation fails.
However, it’s important to note that you cannot disable indexes supporting PRIMARY KEY or UNIQUE constraints; for these, you must drop and then re-add the constraint.
The performance improvements from using the “Disable and Rebuild” strategy are significant. In tests, deleting over 2 million rows:
With one nonclustered index, the “Disable and Rebuild” method was 30% faster than leaving the index on.
With three nonclustered indexes, it was a staggering 63% faster, achieving the same work with 64% less I/O compared to leaving indexes enabled. The core DELETE operation performed nearly as fast as a baseline with no indexes at all, with minimal time spent disabling and rebuilding.
Avoiding Performance Throttling: Azure SQL tiers have resource limits (IOPS, CPU). The “leave ’em on” approach’s high resource consumption increases the risk of hitting these limits, leading to throttling and impacting the performance of all applications using the database. The “disable and rebuild” strategy keeps resource usage low and predictable, protecting the overall health of your instance.
Taming the Transaction Log: A heavily indexed DELETE operation generates immense transaction log activity, which can cause LOG_RATE_GOVERNOR waits—a common performance bottleneck in Azure. The batched DELETE on a heap (after index disabling) is far gentler on the log, ensuring smoother and more reliable operations.
Improved Stability: By reducing resource spikes and log activity, the strategy contributes to a more stable and predictable database environment, minimizing disruptions to other workloads.
No, this strategy is primarily applicable to nonclustered indexes. You cannot disable an index that supports a PRIMARY KEY or UNIQUE constraint using this method. For those, the constraint itself must be dropped (which also drops the underlying index) and then re-added to achieve a similar effect of rebuilding the index. The examples and performance data specifically focus on nonclustered indexes.
In the context of database tables, a “heap” is a table that does not have a clustered index. This means the physical order of data rows is not sorted based on any key; instead, rows are stored in an unordered manner. Heaps are common in many production environments. Simulating a heap in the test environment (by dropping the clustered primary key on dbo.Posts) allowed the researchers to create a scenario representative of many real-world production setups and to accurately measure the impact of nonclustered indexes on deletion performance without the inherent ordering benefits of a clustered index.
Yes. While this test used a heap table to isolate the workload, the principle remains the same for tables with a clustered index. By disabling the nonclustered indexes, you still avoid the significant overhead of maintaining each one during the deletion process. The DELETE will proceed against the clustered table, and the subsequent rebuild of the NCIs will still be far more efficient than the row-by-row maintenance.
Not necessarily. Disabling an index is a speedy metadata operation. The DELETE itself will take locks as it usually would, which is why batching is so essential. Crucially, the REBUILD step can be performed with the ONLINE=ON option in Enterprise, Developer, and Azure SQL tiers. An online rebuild allows users to continue reading from and writing to the table while the index is being rebuilt in the background, minimizing the impact on application availability.
If the REBUILD command fails, your data is safe, and the deletion is already committed. However, the nonclustered indexes will remain in a disabled state. This means that queries can still access the table data, but any query that relies on those disabled indexes for performance will suddenly become much slower. You would need to troubleshoot the cause of the rebuild failure (like insufficient log space or tempdb space) and then successfully run the ALTER INDEX … REBUILD command to bring the indexes back online.
Elevate your Azure experience.
Please contact us for more information.