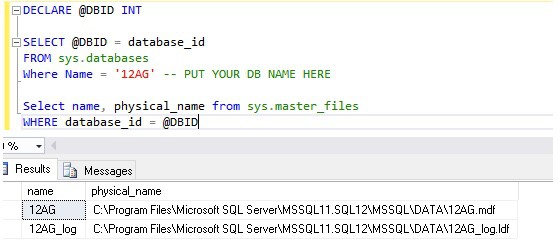
I was recently given a task to move a few multi-terabyte databases inside of an availability group from SAN A to SAN B within a 10-minute window. The good news was there was plenty of time to plan and prepare. For the purpose of this example, I will be using a very small database and just moving from the C: drive to a D: drive; but functionally and, in principle, it is the same. As you can see below the files for the database 12AG are located on the C: drive.
We will accomplish the move using log shipping. This approach allows us to stage the entire database on the new storage and keep it updated until we reach our maintenance window. While I am not going to go into detail on how to setup log shipping, I will say it needs to be configured on the primary replica. In this example, I configured log shipping to ship from the primary replica to the primary replica to a database with a different name. See below:
Steps to Take
Once you have log shipping setup and the log shipped database is current, you are ready to begin your maintenance window. The following steps will allow you to change storage and keep you AG in sync with minimal downtime.
1. Disable the log shipping backup jobs.
We do this to ensure we know exactly where we are in the backup chain. Further, we will take two final log backups which will need to be manually restored, and it will be much easier if we don’t have to worry about additional log files from the log shipping routines.
2. Manually run the copy and restore job to ensure all of the logs are processed to the temporary LS database (DBName -12AG).
Run the copy and restore jobs to ensure that we have completed the log shipping aspect of the move. We will clean up the log shipping artifacts later, as we don’t want to take steps that can be done outside of the window until we have completed the move.
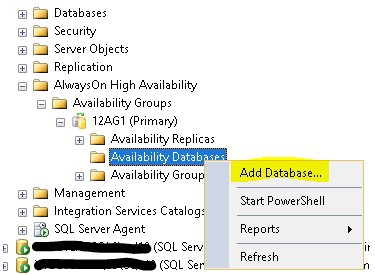
3. Connect to the primary replica, verify that all of the secondary nodes are synchronized and remove the database from the availability group.
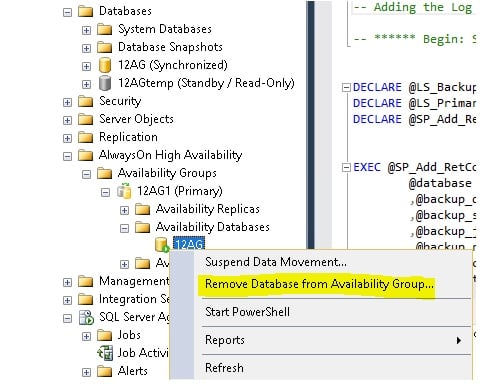
This step will cause all of the secondary nodes to revert back to a restoring state—and become unreadable. If you have routing configured, it will no longer send read-only requests to the secondary replicas. At this time, your application will not longer be able to connect.
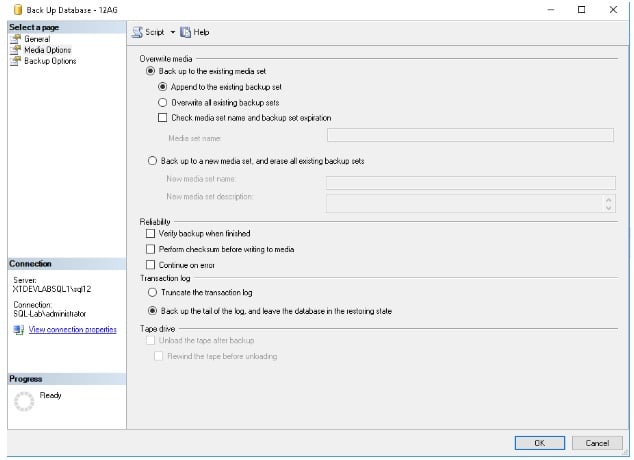
4. Create a manual transaction log backup of the source database – (DBName – 12AG on the primary Replica)
a. Select the Backup the tail of the log and leave the database in the restoring state to ensure no additional transactions are allowed
b. Be sure to note the location and name of this out of band log backup as it will need to manually restored to the temp LS database (DBName – 12AG) as well as the database on all replicas in the AG
This step sets the database on the primary replica to a restoring state. This is important because not everyone has the ability to fully stop their application. By doing this, it will ensure that all transactions are captured and prevent any additional transactions from being written.
Depending on your environment and how busy your database is, you may run into an issue where exclusive access cannot be attained, and are therefore unable to perform this action. Because of this possibility, I recommend scripting the log backup with the tail of the log. This will enable you to script putting the database into single user mode and executing the log backup from the same window. The script can be generated from the clicking script on the backup window, but do not set to single user and then try to do the backup via the GUI. You risk the connection being grabbed by another process—and then you’ll be scrambling.
USE master;
GO
ALTER DATABASE 12AG
SET SINGLE_USER
WITH ROLLBACK IMMEDIATE;
*SQL Authority does a good job of explaining the ‘with rollback immediate’ option if you’re not familiar with it here.
5. Restore the transaction log you just took (of DBName – 12AG) to the primary Replica’s log shipped database (DBName -12AGTemp) using the ‘with recovery’ option.
6. Delete the original database on the primary replica (DBName – 12AG)
DROP DATABASE 12AG
While this step sounds scary, it is necessary. When you set up the log shipped database, you’re required to give it a different name than the original database. After you drop the original database, we will rename this database the original name.
7. Set the log shipped database to Multi-User
We set the database to Multi-User before renaming because, once the database is renamed, read/write connections will be accepted from the application on the primary replica. If we rename prior to setting to multi-user, we risk losing the connection since the database was set to single user.
USE master;
GO
ALTER DATABASE 12AGtemp
SET MULTI_USER
WITH ROLLBACK IMMEDIATE;
8. Rename the log shipped database to the original database name.
USE master;
GO
ALTER DATABASE 12AGtemp
Modify Name = [12AG];
9. Take a 2nd transaction log backup of the newly renamed database on the primary replica
We have to take a 2nd transaction log backup because the first transaction log backup has the read-only flag set. This will keep us from being able to add the database back to the availability group on the secondary replicas.
10. Restore both of the transaction logs to all secondary replicas using the No Recovery option
If you recover the database on the secondary replicas, you will have to reinitialize the database on that replica. Since we are trying to do this with as little downtime as possible given our requirements, the importance of using the no recovery option on the secondary replicas is significant.
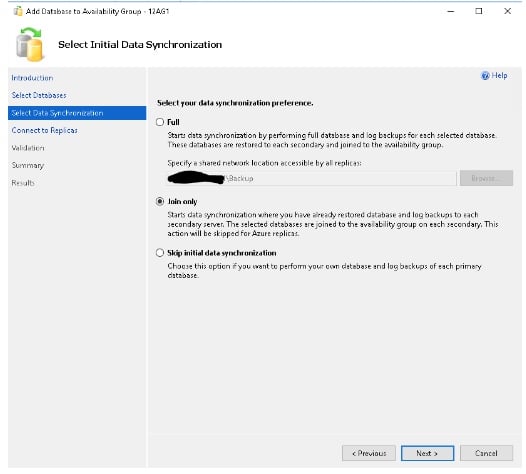
11. On the primary replica, join the database back to the availability group using the Join Only option.
12.
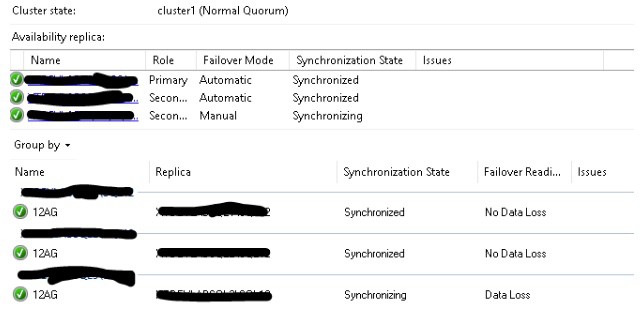
13. Verify synchronization and connectivity.
You can see from the dashboard all of our replicas are functioning as expected and available for either read/write or read connections, as defined in the availability group. The 3rd node is an asynchronous replica. Its state is synchronizing and could allow for data loss in the event of a manual failover, but still accepts new transactions.
We can also verify our files are now in the new location.

At this point, your application should be fully up and running. Read-only requests will route to the appropriate replica (if you have that configured) and you can end your maintenance window.
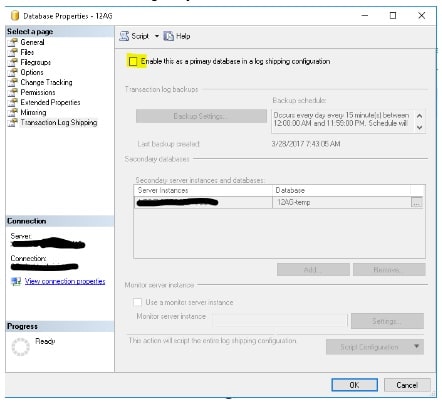
14. Clean up log shipping artifacts
Since log shipping is based on database name, the database will still be configured for log shipping. All we need to do is disable the database for log shipping, and SQL Server will clean up all of the artifacts—including the jobs.
As you can see, we are able to move locations with minimal downtime by using this approach. We could further reduce the downtime by scripting the log backups and restores in advance on all replicas, as well as the adding the database back into the availability group. By scripting each step, you will be able to move the storage as fast as a log backup and restore will take (with only a few additional seconds) to remove and join the database to the availability group. As with any process, you should test this and be very comfortable with each step prior to running in a production environment.