SUMMARY:
When configuring an SSIS OLE DB connection in Microsoft Visual Studio 2015 fails to correctly register the ‘Connect Timeout’ setting of 0 (unlimited), administrators must utilize specific workarounds—either within the Connection Manager or through an XML configuration file—to prevent persistent network-related “Login timeout expired” errors during execution.
- The default ‘Connect Timeout’ for SSIS packages is 15 seconds, and when left unspecified, it can lead to package failures due to network hiccups.
- Directly setting the timeout to 0 in the connection manager initially registers falsely as null unless a non-zero value is specified first.
- The Connection Manager workaround requires setting the ‘Connect Timeout’ to a non-zero value (e.g., 60), saving, and then re-opening and changing the value to 0 to correctly embed
Connect Timeout=0in the connection string. - Alternatively, the Configuration File Workaround involves creating an XML configuration file through the Package Configuration Organizer and manually editing the XML to set the
Connect Timeoutto 0.
Despite the utility of these methods for achieving an unlimited timeout, IT professionals are warned that setting the ‘Connect Timeout’ to 0 can cause SSIS packages to continue consuming server resources indefinitely if the target SQL Server is unavailable for an extended duration.
A challenge arose with a client’s SSIS packages occasionally failing. They received the following error:
Description: “Login timeout expired”.
An OLE DB record is available. Source: “Microsoft SQL Server Native Client 11.0” Hresult: 0x80004005 Description: “A network-related or instance-specific error has occurred while establishing a connection to SQL Server. Server is not found or not accessible. Check if instance name is correct and if SQL Server is configured to allow remote connections. For more information, see SQL Server Books Online.”
After reviewing possible reasons for this occurrence, we determined the issue was network-related. I checked for a ‘Connect Timeout’ setting in the connection string and noticed that it was not specified. This means that it was set to the default setting, 15 seconds. We recommended they set the ‘Connect Timeout’ high enough to account for any network hiccups. To my surprise, the client responded that they initially set the ‘Connect Timeout’ in the Visual Studio’s connection manager to 0 per their documentation. Setting the ‘Connect Timeout’ to 0 gives the SSIS package an unlimited amount of time to attempt connection. This should have displayed in the connection string and prevented the error they received. This was not the case. I decided to attempt to duplicate their problem.
All testing was done in Microsoft Visual Studio 2015 Update 3. The instances and databases used are on XTIVIA test servers.
I started by creating a simple OLE DB connection through the connection manager. So far, no problems.
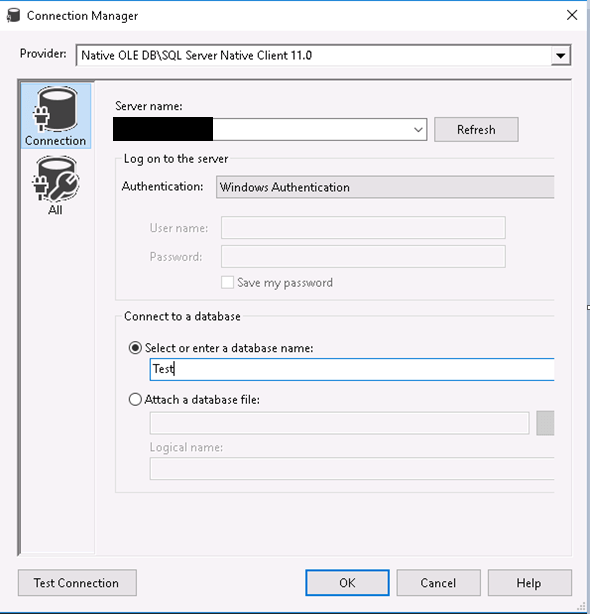
The issue occurred when I went to the ‘All’ tab. Though ‘Connect Timeout’ was set to 15 seconds by default, there was a 0 in the space next to it.
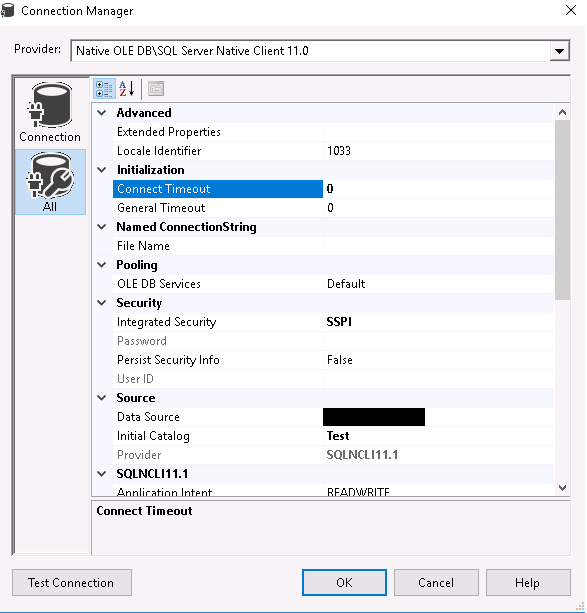
It registered as being null when saved, and ‘Connect Timeout’ was not specified in the connection string.
In this example, the resulting connection string was as followed:
Data Source=;Initial Catalog=Test;Provider=SQLNCLI11.1;Integrated Security=SSPI;Auto Translate=False;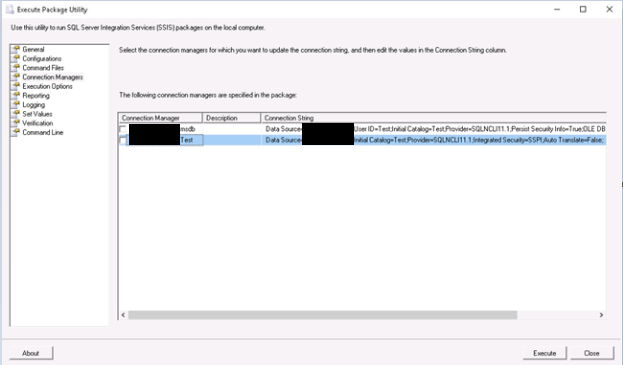
I ran the test SSIS package I created and duplicated the timeout error they received.
The setting falsely registers as null if a number higher than 0 is not specified. Because of this, it only presents a problem if the goal is to set the ‘Connect Timeout’ setting to unlimited.
The Connection Manager Workaround
Our team does not usually recommend having the connection timeout set to unlimited. This causes the SSIS package to continue to use resources until the command can complete. If there are multiple SSIS package jobs and the server is unavailable for an extended period, this could cause the SSIS package jobs to pile up until the server becomes available. Nonetheless, I wanted to find a way to set it 0 in case it was necessary. After numerous tests, I identified a workaround which did not involve manually setting the connection string or setting up a configuration file.
Step 1: Set the ‘Connect Timeout’ Setting to Any Value
As shown in the image below, I set the timeout to 1 minute, in seconds.

Once I clicked ‘OK’, it generated two following connection strings, as predicted:
Data Source=;Initial Catalog=Test;Provider=SQLNCLI11.1;Integrated Security=SSPI;Connect Timeout=60;Auto Translate=False;

Step 2: Change the ‘Connect Timeout’ Setting to 0
I re-opened the connection manager for. Test and changed the ‘Connect Timeout’ setting to 0.

I again clicked ‘OK’ and saved the package. The following was the new connection string:
Data Source=;Initial Catalog=Test;Provider=SQLNCLI11.1; Integrated Security=SSPI;Connect Timeout=0;Auto Translate=False;
I re-ran the test SSIS package and confirmed it was no longer failing due to the “Login timeout expired” error.
In summary, a few extra steps are needed to set ‘Connect Timeout’ through the configuration manager:
- Set “Connection Timeout” to any number
- Save the connection manager
- Reopen configuration manager
- Set the “Connection Timeout” to 0
- Save the package
Now ‘Connect Timeout’ should be set to “Unlimited” in the connection string.
The Configuration File Workaround
The connection string is overridden when a configuration file is added. This also allows ‘Connect Timeout’ to be set to 0 by altering an XML file.
Step 1: Create a Connection Manager
As shown in the image below, I set the timeout to 1 minute as I did in the configuration manager work around. This is not necessary. It can be left as 0, but this made it easier to alter the connection string in a later step.

It generated the following connection string:
Data Source=;Initial Catalog=Test;Provider=SQLNCLI11.1;Integrated Security=SSPI;Connect Timeout=60;Auto Translate=False;
Step 2: Open Package Configuration Organizer
Under the SSIS tab, I opened the Package Configuration Organizer.
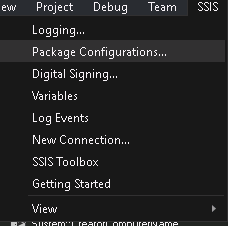
Step 3: Ensure the Package Configuration is Enabled & Click Add
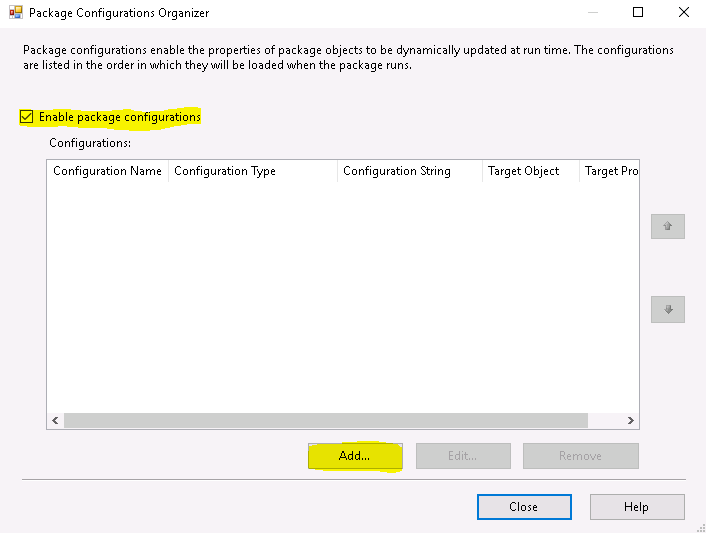
Step 4: Follow the Package Configuration Wizard Instructions
I set my configuration type as a XML configuration file.
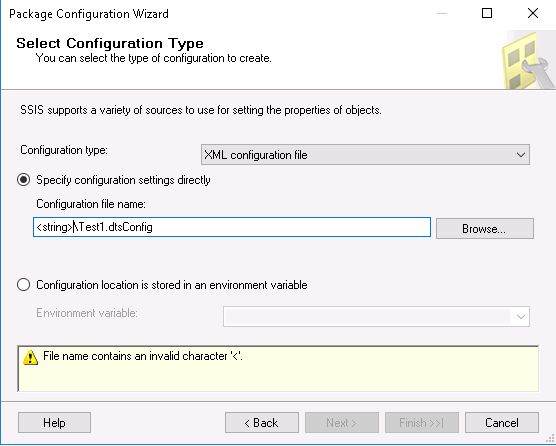
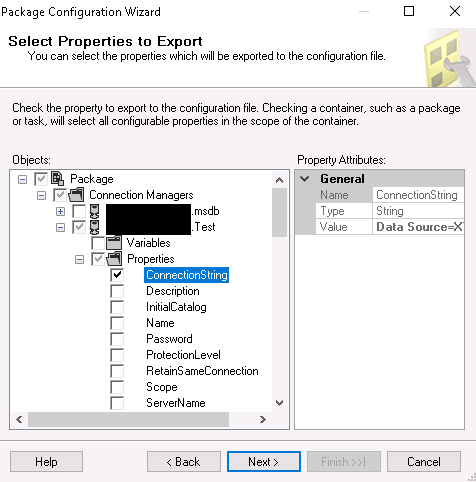
I selected the connection manager and property I wanted in the configuration file. Here any configurable properties can be selected. For the sole purpose of setting the ‘Connect Timeout’, I only selected was ConnectionString under properties.
From here, I reviewed my choices and finished.
Step 5: Open and Edit the XML File
I opened the XML configuration file that I created in step 4. Inside the file was the following connection string:
Data Source=;Initial Catalog=Test;Provider=SQLNCLI11.1;Integrated Security=SSPI;Connect Timeout=60;Auto Translate=False;I altered the 60 for the Connect Timeout to 0 and saved.

The new connection string when I executed the SSIS package was as followed:
Data Source=;Initial Catalog=Test;Provider=SQLNCLI11.1;Integrated Security=SSPI;Connect Timeout=0;Auto Translate=False;
If you would like more help getting this setup on your SQL Server please get in touch with one of our SQL Server DBA experts today!

