This checklist outlines the steps I took to migrate SQL Server Always On 2017 Enterprise to 2019 Enterprise edition. Having mixed versions of AG’s is a temporary solution meant for upgrading or migration purposes only and is not intended for long term use.
Preparing Our New Environment
1). Stand up new servers, ensure block size of drives used for data/log files of system & user databases as well as tempdb are sized for 64k. (All drives with ldf\mdf & TempDB)
2). If this is a multi-subnet environment secondary IP’s will be needed for each replica being added to an AG Listener. If nodes are all in the same subnet no additional IP’s required.
*** Each IP address assigned to Listener MUST be unique & not used anywhere else on the network
3). Install Windows Failover Cluster Manager and .NET Framework 3.5 on each new server.
4). Install\Configure SQL Server 2019, then restore DB’s to new instance with ‘SA’ as owner.
5). Confirm old & new servers have the same service accounts for SQL Engine\Agent.
6). Migrate other objects using DBATools (Logins, Linked Servers, Jobs and disable agent jobs)
URL: https://dbatools.io/
7). Test connectivity for users and applications to minimize & prevent errors later.
8). Enable AlwaysOn High Availability and ADD new servers to the cluster.
9). Run SQL Server Upgrade Advisor on source and resolve any issues reported before migration. CPU impact depends on the environment.
Synchronizing New Environment & Cutover
*** Take backups in case of Rollback
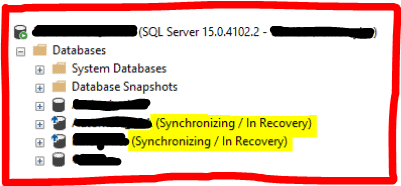
10). ADD new nodes to current AG’s as Asynchronous secondary replicas temporarily. This can be done by restoring the most recent Full & Diff if backups are configured to run on primary. Confirm AG’s are still healthy w\o issues. The DB’s recently added to the AG will show as Synchronizing/In Recovery until SQL versions are no longer mixed during the actual cutover process. (screenshot below)

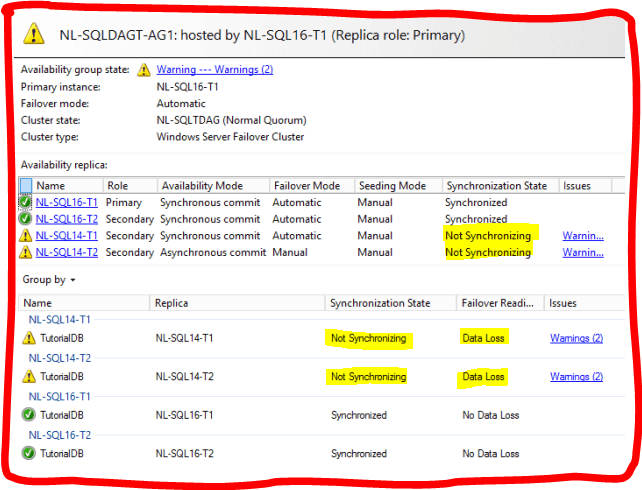
11). Do a manual failover to new primary replica(s). Once failover is successful old replicas will show status of ‘Not Synchronizing(Data Loss)’ (screenshot below)
– Failover from 2017 to 2019 is a one way street and failing back from 2019 to 2017 will not work. If a Rollback is needed then restore most recent 2017 backups.

12). Once all is synced verify AG health then test connections for users\applications. Also manual failover can be tested here as well.
13). Run Full backups on 2019 to start the t-log chain.
14). Once everything is verified as healthy and rollback is not necessary then we can remove the old replica(s) from AG’s & nodes from the failover cluster.
15). Enable SQL Agent jobs that need to run on new servers. Compare jobs to those on the old nodes.
Even though we planned and tested to minimize or eliminate errors with our migration there were still a couple issues that surfaced. This next section includes the issues that we faced post-migration.
Issues Encountered:
1). Msg 7399, Level 16, State 1, Line 3
The OLE DB provider for linked server reported an error. The provider reported an unexpected catastrophic failure.
Msg 7343, Level 16, State 4, Line 3
The OLE DB provider for linked server could not UPDATE table . Unknown provider error.
Solution:
The ODBC needed to be updated.
2). Needed to enable xp_cmdshell (may vary per environment).
I included a few links below for additional reference points. Hopefully this checklist was beneficial and always make sure you test your process to identify and resolve possible issues.
https://docs.microsoft.com/en-us/sql/database-engine/availability-groups/windows/upgrading-always-on-availability-group-replica-instances?view=sql-server-2017
https://docs.microsoft.com/en-us/sql/database-engine/availability-groups/windows/distributed-availability-groups?view=sql-server-ver15#sql-server-version-and-edition-requirements-for-distributed-availability-groups

